Hot Air/Hot Gas Welding
Thermoplastic material that can be softened or shaped by heat with an electric hot air/gas welder is normally weldable. Light weight, hand-held equipment makes it easy for even the inexperienced user to develop the “feel” for welding plastic and to do it economically and with speed after only a few hours of study and practice. Whether fabricating thermoplastic stock or repairing various types of plastic parts, hot air/gas welding is usually performed on plastics with a minimum thickness of 1/16”. The bond achieved, depending on the type of weld, is generally as strong (90 percent) as the parent material.
Getting Started
After following the step-by-step instructions from the manufacturer of the welder and plastic materials, you will be ready to begin welding. Hot air/gas welding is safe because there is no flame, spark or smoke involved.
Observe these simple precautions:
- Never attempt to perform hot air/gas welding with a flammable gas. (Use inert gas only!)
- To avoid burning out the heating element, always remember airflow first and airflow last! Start the airflow before the heating element. Set the airflow between 3½ to 4 P.S.I. to prolong the life of the element.
- Never touch metal parts on the welding gun until they have cooled.
- Always use pliers to change the tip on a welding gun. Do not over-tighten!
- Disconnect the electricity to the gun but continue the airflow. The gun will cool faster and the electric heating element will last longer.
- Do not put the welder in a vise to change the heating element.
Setting Up Your Welding Equipment
Once you have reviewed all the safety regulations for your welder, follow these steps to set up your welding equipment:
- Connect your welding gun to a clean, dry air supply (compressed air) or an inert gas.
- Most welders can be plugged into any 115-volt AC outlet. A ground is provided and should be used. Now that you have your air supply flowing, plug into the electrical source and allow the welder to warm up for several minutes before starting to weld.
- Be sure to select the proper welding tip. Choose a tacking tip (see #13) for fitting up the work (no rod or strip is required for tacking), round tip (#14) for small areas or automatic feed tip for speed and larger areas.
- Always use pliers to install and remove tips.
Preparing The Plastic Material
While your welder is heating up you can take the time to prepare the material by doing the following:
- Determine whether or not the type of weld you will make will require a beveled edge.
- If beveling is required, perform the beveling with a grinder or table saw. Bevel a 60° angle.
- Clean dust and dirt from materials to be welded. To remove oily substances, use methyl ethyl ketone (MEK).
Be sure materials are dry before starting to weld.
Performing Tack Welding
Most welding operators begin by tack welding which is a temporary weld. The steps are as follows:
- Install the tacking tip and allow the hot air/gas to flow through the tip to heat it up.
- While the tip is heating, align the pieces to be welded.
- No rod or strip is required for tack welding. Apply the hot tacking tip to the area or seam where the plastic pieces are to be joined.
- Make enough tack welds to hold the weight of the pieces together. With large pieces it may be necessary to draw the tacking tip along the entire seam, fusing the work continuously. This will hold the seam together properly for accurate permanent bonding which will be performed during the next phase.
- Avoid overheating the tack points. This causes the plastic material to discolor, char or warp. If you aren’t satisfied with the welds, grind the tack points down to smooth the edges.
Performing Permanent Welds
Basically the same types of welds are performed in hot air/gas welding as in metal welding. These consist of butt welds, fillet welds, lap joints, edge welds and corner welds. Whether using a round tip or an automatic feed tip, the following procedures should be followed:
- Select the right type of welding rod (or strip). It must be the same type of plastic as the base material. If you do not know what type of plastic you are welding, refer to a burn test chart to identify the material you are going to weld.
- For maximum welding economy, select a rod diameter size close to the thickness size of the base material. For base material thickness greater than 3/16” more than one rod will be necessary. Example: In order to weld the beveled area between two base material sheets of 1/4” thickness, three 5/32” rods will be required.
- Select the proper welding temperature for the material and air flow setting.
- Install the proper round or automatic feed tip and allow it to pre-heat. If you change from the tacking tip to the round or automatic feed tip while the welding gun is hot, be sure to unscrew the tips using pliers. Do not over-tighten; the tip should only be snug.
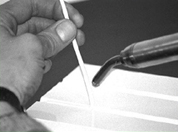
- Cut the end of the rod at a 60° angle. Hold the cut end of the rod just above the weld starting point. Apply heat to the rod end and the base material seam at the same time until both are tacky. Press the tacky end of the rod down into the tacky starting point of the base materials. Only the surface of the rod and base materials will be tacky but will bond properly. The rod will continue to hold its basic shape, for the most part, throughout the welding work.
- Continue the weld holding the rod at a 90° angle directly above the weld seam pressing firmly and evenly into the weld joint as you apply heat in the direction of the weld seam with a short fanning motion. As the rod and base material become tacky, if you are welding at the proper temperature, a loop will form where the rod joins the base materials and small beads will form on either side of the complete weld.
- At the end of the weld cut the rod with a knife or pliers at a 30° angle. Cut the end of the new rod at a 60° angle to continue.
Welding Completion
There should be no charring, discoloration or warping if proper heat is applied. There should be no stretching of
the welding rod. This will weaken the rod bond and can be avoided by taking care to press directly down on the rod
rather than pushing the rod along the direction of the weld seam. A few hours of practice welding will provide
the “feel” for maintaining the right, even pressure on the rod straight down into the weld area.
If you are using an automatic feed tip for high speed welding either the rod or strip is fed through the tip, which makes it unnecessary for the welding operator to hold the rod or strip in hand while welding is performed. High speed welding can join approximately 2 to 3 feet per minute. Seams, joints or repair areas can be as strong as or stronger than the parent or base material welded (90 percent or better, depending on the type of weld applied).
When performing high speed welding, remove the welding rod from the feeder tube immediately when the weld is complete. Always clean the rod feeder tube with a feeder tube brush before and after completion of the weld.
After all the welding has been completed, unplug the electricity to the welder but allow the air to flow through for several minutes to cool the element. After your welds have cooled you can test them by either filling your container with water or using a leak detector. If you have leaks, repeat the above procedures.
Written by Paige D. Bowen, Marketing Director for Seelye, Inc., manufacturers of a full line of hot air/gas welders.