Plastic Welding: The Right Start
Editor's Introduction
In "Plastic Welding: The Basics", Andy Bramer, Plastics Technologist for Drader Injectiweld, reviewed the types of plastic welds that are generally available to plastic fabricators and briefly discussed the three key parameters to consider when plastic welding (heat, pressure, and time). In this article, Andy will offer a more in-depth look at plastic welding. From getting the right start, to safety and health concerns, this series will address
splicing of thermoplastic materials and repairs on plastic parts. Thermoplastic welding is "hot"!
When somebody talks about welding, some people automatically think of steel. Plastic welding is, in a lot of industries, mostly unrecognized, but fabricators often need to join plastic parts together in one way or another. Not all plastic elements are suitable for adhesives. So what other methods besides mechanical fasteners are available? The most likely procedure to choose is plastic welding.
Fabricators new to plastic welding often ask "Where do I start?" "What do I need to know to make a proper plastic weld?" Well, quite a few things have to be considered before a proper start can be made.
The selection of the right welding equipment can be a real challenge. Knowing the application is necessary to finding the equipment that fits the needs. There is a suitable solution for all plastic welding requests, but some welding tools are not appropriate for certain kinds of plastic materials. In other words: If you know the material, the working area, the kind of assembly, your choice of plastic welder will be much easier.
There are a countless number of plastic materials and blends on the market today. And while it is not always easy to recognize the plastic family, it is very important. All plastics are different in behavior and chemical structure to each other. The wrong welding rod will mean the difference between a strong weld and poor weld quality.
Most common plastic materials can be identified by four simple identification tests. Most testing labs offer a service of plastic identification or you can try the following tests yourself.
Scratching Test
This test is not very accurate, but it helps to give an idea what plastic you might be working with. Plastics have a certain surface hardness. Some are harder like ABS or PVC; some are softer like PE and PP.
Scratch the surface of the plastic with your fingernail. If you see a scratch you know it can't be ABS, PVC or any other hard plastic. So the group you are looking for is PE, PP, PTFE or another softer material.
Sound Test
Because of the different specific weight, and surface hardness, of plastic materials, the sound is not the same. An exact identification is hard to determine however.
Take a solid piece of the material and drop it on a hard and even surface from a height of approximately 5-10 inches (or 10–25 cm). You will hear specific tones. A trained ear can hear slight differences in a plastic's tone. Often this is a reliable determinant in discovering the plastics family.
Floating Test
Like the previous tests, this test only points to the identity of a plastic's family. All plastic materials have a specific weight that is higher or lower than the specific weight of water.
Take a glass filled with clear water (the water should be around room temperature). Cut small pieces of the plastic you want to test. Ad the sample to the water and observe the behavior. Only two plastic materials will float - PE and PP. All other plastics will sink.
Burning Test
This method is by far the most accurate test you can do by yourself. Every plastic material reacts differently when you burn it. For this test it is very important to know the different behaviors and smells of plastic. If possible, keep samples of plastic materials that you already know. You can compare these samples with the unknown plastic. Sometimes there is a stamp on plastic parts. This would be perfect to keep as a sample.
 First, find a place where you will have enough fresh air. Second, scratch off a thin sample of the material and place it on a "heat resistant"' surface– DO NOT HOLD THE SAMPLE IN YOUR HAND. Third, take a lighter and burn the sample. The use of matches is not recommended because of the scent of the sulfur.
Observe the reaction, flame or no flame, color of flame, carbon above the flame, etc. Next, blow out the flame. Fan the rising smoke carefully to your nose and smell the odor. PE produces a Blue/Yellow flame, smokes, and smells like paraffin (candle). PP produces a Blue/Yellow flame, drips, and smells diesel like.
 By combining these four tests, you should be able to identify the plastic material you are working with. After this, you are ready to start the actual welding process.
Plastic welding in theory - Not all types of plastic materials are weldable.
Only same, or to a limited degree different, thermoplastic materials are weldable. Welding of plastics is done by bringing them up to the specific weld temperature (viscous flow), joining them under pressure, and allowing them to cool down slowly!
Considerations of Plastic Welding
The welding area must be kept clean at all times. Surface preparation is necessary. Every particle that remains in between the weld will affect the strength of the actual weld. The best way to clean the weld area is to scrape off the first layer of the material surface. Do not use sanding paper because the dust will stay on the surface. Solvents should only be used carefully. First, it is harmful as well as the solvent's holdovers will approach inside the weld. The best cleaning tool is a scraping blade.
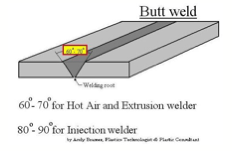
All hot air-, extrusion-, or injection- welding joints need to have a root bead on the opposite weld side to avoid a cracking area and to give more strength to the weld. It is necessary to weld down to the welding root.
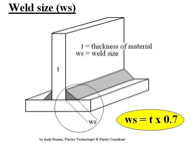
Another important component is the weld size. As a sample and an easy to follow "rule of thumb", you can use the following.
Other weld designs may have other requirements, but as a start this will work.
All of the above is only the beginning. There are several more things you need to know to weld plastic. We will provide some of them in the next article. Until then, consider the following three steps before you start any plastic welding.
- Know the application.
- Know the material.
- Know the welding system.
More questions will occur, but if you know the answers to the three steps above and get enough practice, you will have a pretty good plastic welding start.
DISCLAIMER
This article is provided as is without any express or implied warranties. While every effort has been taken to ensure the accuracy of the information contained in this article, the maintainer and contributors assume no responsibility for errors or omissions, or for damages resulting from the use of the information contained herein.
Copyright © 2002 The Plastics Distributor® & Fabricator Magazine.
All Rights Reserved.